

Before jumping straight into the webpack, we will see how javascript is used without webpack and then understand how javascript is used with webpack and what problems webpack solves for us.
Javascript without webpack.
There are two ways to run JavaScript in a browser:
- We can include one big .js file containing all our project code, but this leads to problems related to scope, size, readability, and maintainability. What's the solution to this now? Let's see the second way.
- We can include multiple .js files using script tags, where we will have to maintain the order of each file because one file can be dependent on other files to execute. Also, this solution is hard to scale because loading too many scripts will cause network issues.
As modules are not yet supported by all the browsers, we can not efficiently write modular code which is scalable. This is where webpack comes to the rescue.
Javascript with webpack.
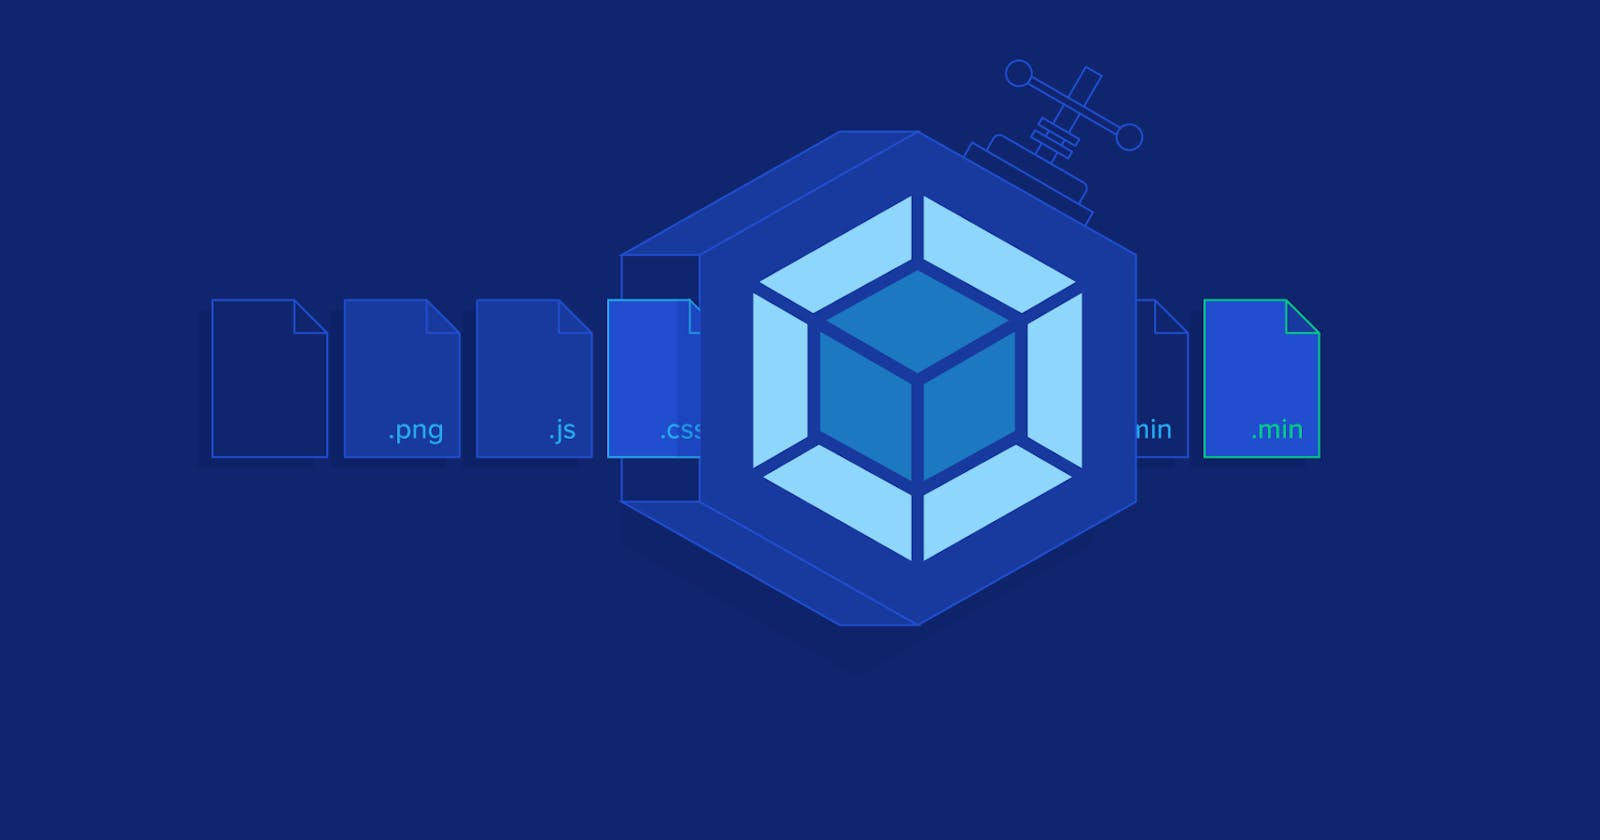
Webpack is a program or tool that when processing your application, internally builds a dependency graph from one or more entry points and then combines every module your project needs into one or more bundles. Or simply said, webpack bundles all your javascript files in one or more bundles(.js file) as required.
Webpack Installation
First, let's create a directory, initialize npm (npm init), and then install the packages webpack and webpack-cli as a dev dependencies.
npm install webpack webpack-cli --save-dev
Now we'll create the following directory structure, files, and their contents:
Directory structure :
|- package.json
|- package-lock.json
|- /dist
    |- index.html
|- /src
    |- index.js
    |- component.js
index.html :
<!DOCTYPE html>
<html lang="en">
  <head>
    <meta charset="UTF-8" />
    <title>Getting Started</title>
  </head>
  <body>
    <div id="wrapper"></div>
     // main.js is a file that webpack will build after bundling
    <script src="./main.js"></script>
  </body>
</html>
index.js
import { component } from "./component";

const wrapperElem = document.getElementById("wrapper");

wrapperElem.innerHTML = component();
component.js
// webpack allows us to use import and export here
import _ from "lodash";  // install lodash package using npm

function component() {
  const content = _.join(["Hello", "webpack"], " ");

  return content;
}

export { component };
In this setup, index.js requires a component function from the component.js file, and then component.js file requires the lodash module which we have declared using import statements. By stating what dependencies a module needs, webpack can use this information to build a dependency graph. It then uses the graph to generate an optimized bundle where scripts will be executed in the correct order. And by default webpack starts building a dependency graph from /src/index.js file and outputs the bundled code in main /dist/main.js.
Now let's run npx webpack, which will take our script at src/index.js as the entry point, start building dependency graph, and will generate dist/main.js as the output which we are integrating into our index.html file.
Now if the build is successful, you will see the "Hello webpack" message in your browser window.
This was a very basic example, but what if our project is complex?
As our project gets complex, you will need to have a configuration file for webpack which will include all the information related to bundling.
webpack.config.js:
// Note: don't use import from path because it
// runs in the node js enviroment at the build time.
const path = require('path');

module.exports = {
  entry: './src/index.js', // default entry point
  output: {
    filename: 'main.js',
    path: path.resolve(__dirname, 'dist'), // default output directory
  },
};
Now we can use the command npx webpack --config webpack.config.js to run the build with the new config file. Further, we can set the build script in the package.json file and use the npm run build command to execute the webpack.
package.json
 "scripts": {
    ...
    "build": "webpack"
   }
We have a basic webpack starter ready. Also, you should know that webpack is not only used for bundling your javascript. Webpack is much more powerful than this. It can be used to run babel to transpile your code, asset management, code splitting, caching, tree shaking, and a lot more.
Thank you for reading till the end. I hope it helped you.
Keep Learning, Keep Growing